Android DayNight Theme Example using AppCompat support library
With the Arrival of the new version 23.2 of library support Android brings a new components that can enrich the user interface. There’s a new theme added to AppCompat in this release: Theme.AppCompat.DayNight.
Before adding this theme to AppCompact developers have to make adjustments to their designs to account for different ambient light levels or time of day, but AppCompat is now offering to automate a little bit of that. Based on your last known location, the latest version can switch between regular and “night” themes for apps.This means developers now have to maintain two sets of themes, but it should also make it better for users.
Let’s Get it Working
In this tutorial we are going to learn how to use Day Night Theme. To really understand the usage of this theme we will create an app . The App contains simple buttons which will demonstrate the different usages of Theme.AppCompat.DayNight. So Firstly , We create a new android project and follow the steps below.
Step 1 ) Update build.gradle file .
Before you can use DayNight Theme in your projects you need to add the following compile line to your Gradle dependencies block in your build.gradle file and rebuilt the project .
dependencies {
    ...
    compile 'com.android.support:appcompat-v7:23.2.1'
}
Step 2 ) Update styles.xml .
Add the below string values to the string.xml located in res => values => styles.xml. you can use any of the following Theme.AppCompat.DayNight, Theme.AppCompat.DayNight.NoActionBar, Theme.AppCompat.DayNight.DarkActionBar.
Here in this example i have used always DarkActionBar Theme.
<resources>

    <!-- Base application theme. -->
    <style name="AppTheme" parent="Theme.AppCompat.DayNight.DarkActionBar">
        <!-- Customize your theme here. -->
        <item name="colorPrimary">@color/colorPrimary</item>
        <item name="colorPrimaryDark">@color/colorPrimaryDark</item>
        <item name="colorAccent">@color/colorAccent</item>
        <item name="android:textColorPrimary">@color/textColorPrimary</item>
    </style>

</resources>
Step 3 ) Update colors.xml .
Add the below color values to the colors.xml located in res => values => colors.xml and res => values-night => colors.xml.
colors.xml file in values(for default mode) folder
<?xml version="1.0" encoding="utf-8"?>
<resources>
    <color name="colorPrimary">#3F51B5</color>
    <color name="colorPrimaryDark">#303F9F</color>
    <color name="colorAccent">#FF4081</color>
    <color name="textColorPrimary">#000000</color>
    <color name="colorBackground">#FFFFFF</color>
</resources>
colors.xml file in values-night(for night mode) folder
<?xml version="1.0" encoding="utf-8"?>
<resources>
    <color name="colorPrimary">#3F51B5</color>
    <color name="colorPrimaryDark">#303F9F</color>
    <color name="colorAccent">#FF4081</color>
    <color name="textColorPrimary">#FFFFFF</color>
    <color name="colorBackground">#000000</color>
</resources>
Step 4 ) Add images to drawables .
we are showing different image based on Mode type. So create drawable and drawable-night folder and put image.png with same name and different image(sun image for drawable and moon image for drawable-night) located in res => drawable and res => drawable-night .
Step 5 ) Update strings.xml . .
Add the below string values to the string.xml located in res => values => strings.xml .
<resources>
    <string name="app_name">DayNight Theme Tutorial</string>
    <string name="text_auto_mode">Auto Mode</string>
    <string name="text_day_mode">Day Mode</string>
    <string name="text_night_mode">Night Mode</string>

</resources>
Step 6 ) Update activity_main.xml .
Open the layout file for the MainActivity.java i.e activity_main.xml located in res => layout => activity_main.xml and add the below code in your layout file . The code will create three buttons.
<?xml version="1.0" encoding="utf-8"?>
<RelativeLayout xmlns:android="http://schemas.android.com/apk/res/android"
    xmlns:tools="http://schemas.android.com/tools"
    android:layout_width="match_parent"
    android:layout_height="match_parent"
    android:paddingBottom="@dimen/activity_vertical_margin"
    android:paddingLeft="@dimen/activity_horizontal_margin"
    android:paddingRight="@dimen/activity_horizontal_margin"
    android:paddingTop="@dimen/activity_vertical_margin"
    tools:context="com.androidtutorialshub.daynightthemetutorial.MainActivity">

    <Button
        android:id="@+id/buttonAutoMode"
        android:layout_width="match_parent"
        android:layout_height="wrap_content"
        android:text="@string/text_auto_mode" />

    <Button
        android:id="@+id/buttonDayMode"
        android:layout_width="match_parent"
        android:layout_height="wrap_content"
        android:layout_below="@+id/buttonAutoMode"
        android:text="@string/text_day_mode" />

    <Button
        android:id="@+id/buttonNightMode"
        android:layout_width="match_parent"
        android:layout_height="wrap_content"
        android:layout_below="@+id/buttonDayMode"
        android:text="@string/text_night_mode" />

</RelativeLayout>
Step 7 ) Update MainActivity Class .
Now Open MainActivity.java and make some changes in code . Here we will see the how to handle DayNight Theme switching . Here onClick of buttons i open another activity named ModeViewActivity to show the theme switching. There are three modes of DayNight Theme we can set it programatically by using AppCompatDelegate.setDefaultNightMode(/*Here we pass the mode type parameter*/). Following are the DayNight Theme modes
->To Set Default Auto Switching Night Mode
AppCompatDelegate.setDefaultNightMode(AppCompatDelegate.MODE_NIGHT_AUTO);
->To Set Default Day Mode
AppCompatDelegate.setDefaultNightMode(AppCompatDelegate.MODE_NIGHT_NO);
->To Set Default Night Mode
AppCompatDelegate.setDefaultNightMode(AppCompatDelegate.MODE_NIGHT_YES);
package com.androidtutorialshub.daynightthemetutorial;

import android.content.Intent;
import android.os.Bundle;
import android.support.v7.app.AppCompatActivity;
import android.support.v7.app.AppCompatDelegate;
import android.view.View;
import android.widget.Button;

public class MainActivity extends AppCompatActivity implements View.OnClickListener {

    //Button Variable
    private Button buttonAutoMode;
    private Button buttonDayMode;
    private Button buttonNightMode;

    @Override
    protected void onCreate(Bundle savedInstanceState) {
        super.onCreate(savedInstanceState);
        setContentView(R.layout.activity_main);

        AppCompatDelegate.setDefaultNightMode(AppCompatDelegate.MODE_NIGHT_AUTO);
        initViews();
        initListeners();
    }

    /**
     * method to initialize the views
     */
    private void initViews() {
        buttonAutoMode = (Button) findViewById(R.id.buttonAutoMode);
        buttonDayMode = (Button) findViewById(R.id.buttonDayMode);
        buttonNightMode = (Button) findViewById(R.id.buttonNightMode);

    }

    /**
     * method to initialize the listeners
     */
    private void initListeners() {
        buttonAutoMode.setOnClickListener(this);
        buttonDayMode.setOnClickListener(this);
        buttonNightMode.setOnClickListener(this);
    }

    /**
     * onClick Listener to capture button click
     *
     * @param v
     */
    @Override
    public void onClick(View v) {

        switch (v.getId()) {
            case R.id.buttonAutoMode:
                AppCompatDelegate.setDefaultNightMode(AppCompatDelegate.MODE_NIGHT_AUTO);
                break;
            case R.id.buttonDayMode:
                AppCompatDelegate.setDefaultNightMode(AppCompatDelegate.MODE_NIGHT_NO);
                break;
            case R.id.buttonNightMode:
                AppCompatDelegate.setDefaultNightMode(AppCompatDelegate.MODE_NIGHT_YES);
                break;
        }

        Intent intent = new Intent(MainActivity.this, ModeViewActivity.class);
        startActivity(intent);

    }
}
Step 8 ) create activity_mode_view.xml .
Create a layout xml named activity_mode_view.xml in res => layout and update the below code in that xml file. This code will create view for theme demonstration. Here TextView will show the theme mode and ImageView will show the sun or moon image depending on the Day and Night Mode.
<?xml version="1.0" encoding="utf-8"?>
<RelativeLayout xmlns:android="http://schemas.android.com/apk/res/android"
    android:layout_width="match_parent"
    android:background="@color/colorBackground"
    android:layout_height="match_parent">

    <TextView
        android:id="@+id/textModeType"
        android:layout_width="match_parent"
        android:layout_height="wrap_content"
        android:layout_marginTop="20dp"
        android:gravity="center_horizontal"
        android:textColor="@color/textColorPrimary"
        android:textSize="20sp" />

    <ImageView
        android:layout_width="wrap_content"
        android:layout_height="wrap_content"
        android:layout_centerInParent="true"
        android:src="@drawable/image" />

</RelativeLayout>
Step 9 ) create ModeViewActivity class .
Create a class named ModeViewActivity and add the below code to the class .We can get current Mode status using AppCompatDelegate.getDefaultNightMode() method .
package com.androidtutorialshub.daynightthemetutorial;

import android.os.Bundle;
import android.support.v7.app.AppCompatActivity;
import android.support.v7.app.AppCompatDelegate;
import android.widget.TextView;

public class ModeViewActivity extends AppCompatActivity {

    private TextView textModeType;
    private int modeType;

    @Override
    protected void onCreate(Bundle savedInstanceState) {
        super.onCreate(savedInstanceState);
        setContentView(R.layout.activity_mode_view);

        initViews();

    }

    private void initViews() {
        textModeType = (TextView) findViewById(R.id.textModeType);

        modeType = AppCompatDelegate.getDefaultNightMode();

        if (modeType == AppCompatDelegate.MODE_NIGHT_AUTO) {
            textModeType.setText("Default Mode Type: Auto");
        } else if (modeType == AppCompatDelegate.MODE_NIGHT_NO) {
            textModeType.setText("Default Mode Type: Day");
        } else if (modeType == AppCompatDelegate.MODE_NIGHT_YES) {
            textModeType.setText("Default Mode Type: Night");
        }
    }
}
Step 10 ) Update AndroidManifest.xml .
Now open the AndroidManifest.xml and declare Activity name ModeViewActivity in manifest to handle the intent.
<?xml version="1.0" encoding="utf-8"?>
<manifest xmlns:android="http://schemas.android.com/apk/res/android"
    package="com.androidtutorialshub.daynightthemetutorial">

    <application
        android:allowBackup="true"
        android:icon="@mipmap/ic_launcher"
        android:label="@string/app_name"
        android:supportsRtl="true"
        android:theme="@style/AppTheme">
        <activity android:name=".MainActivity">
            <intent-filter>
                <action android:name="android.intent.action.MAIN" />

                <category android:name="android.intent.category.LAUNCHER" />
            </intent-filter>
        </activity>
        <activity android:name=".ModeViewActivity"></activity>
    </application>

</manifest>
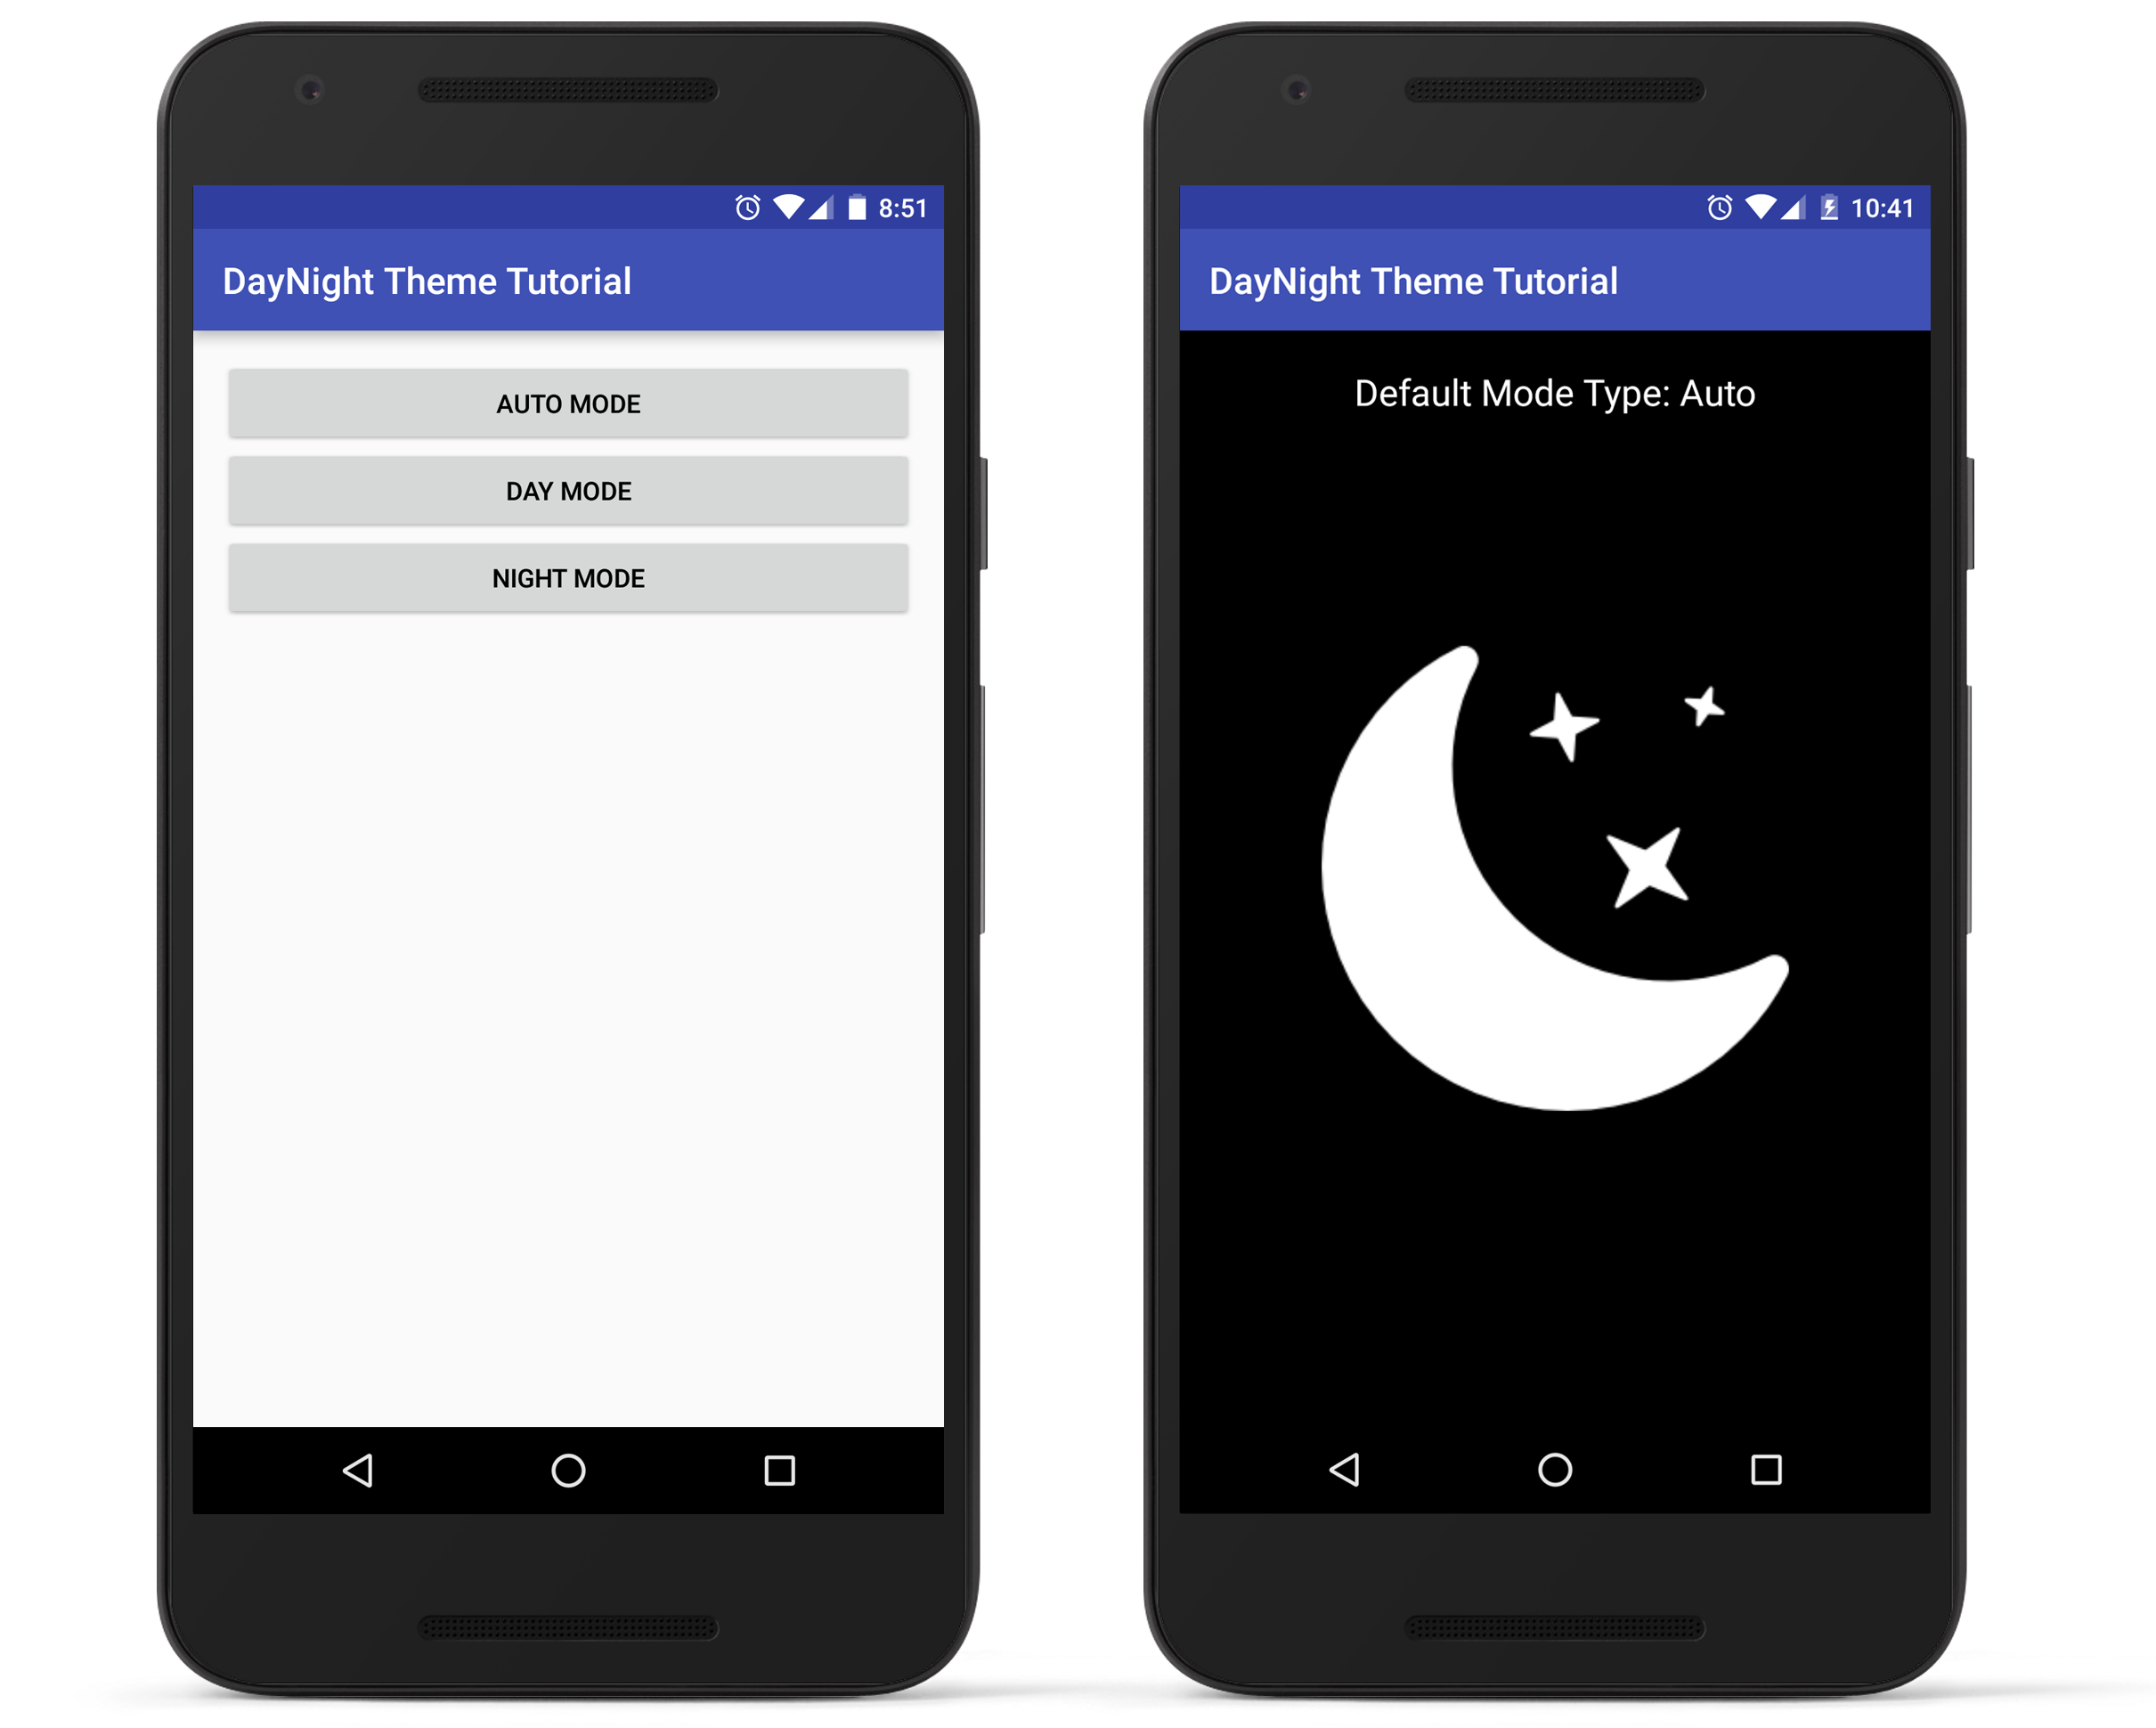
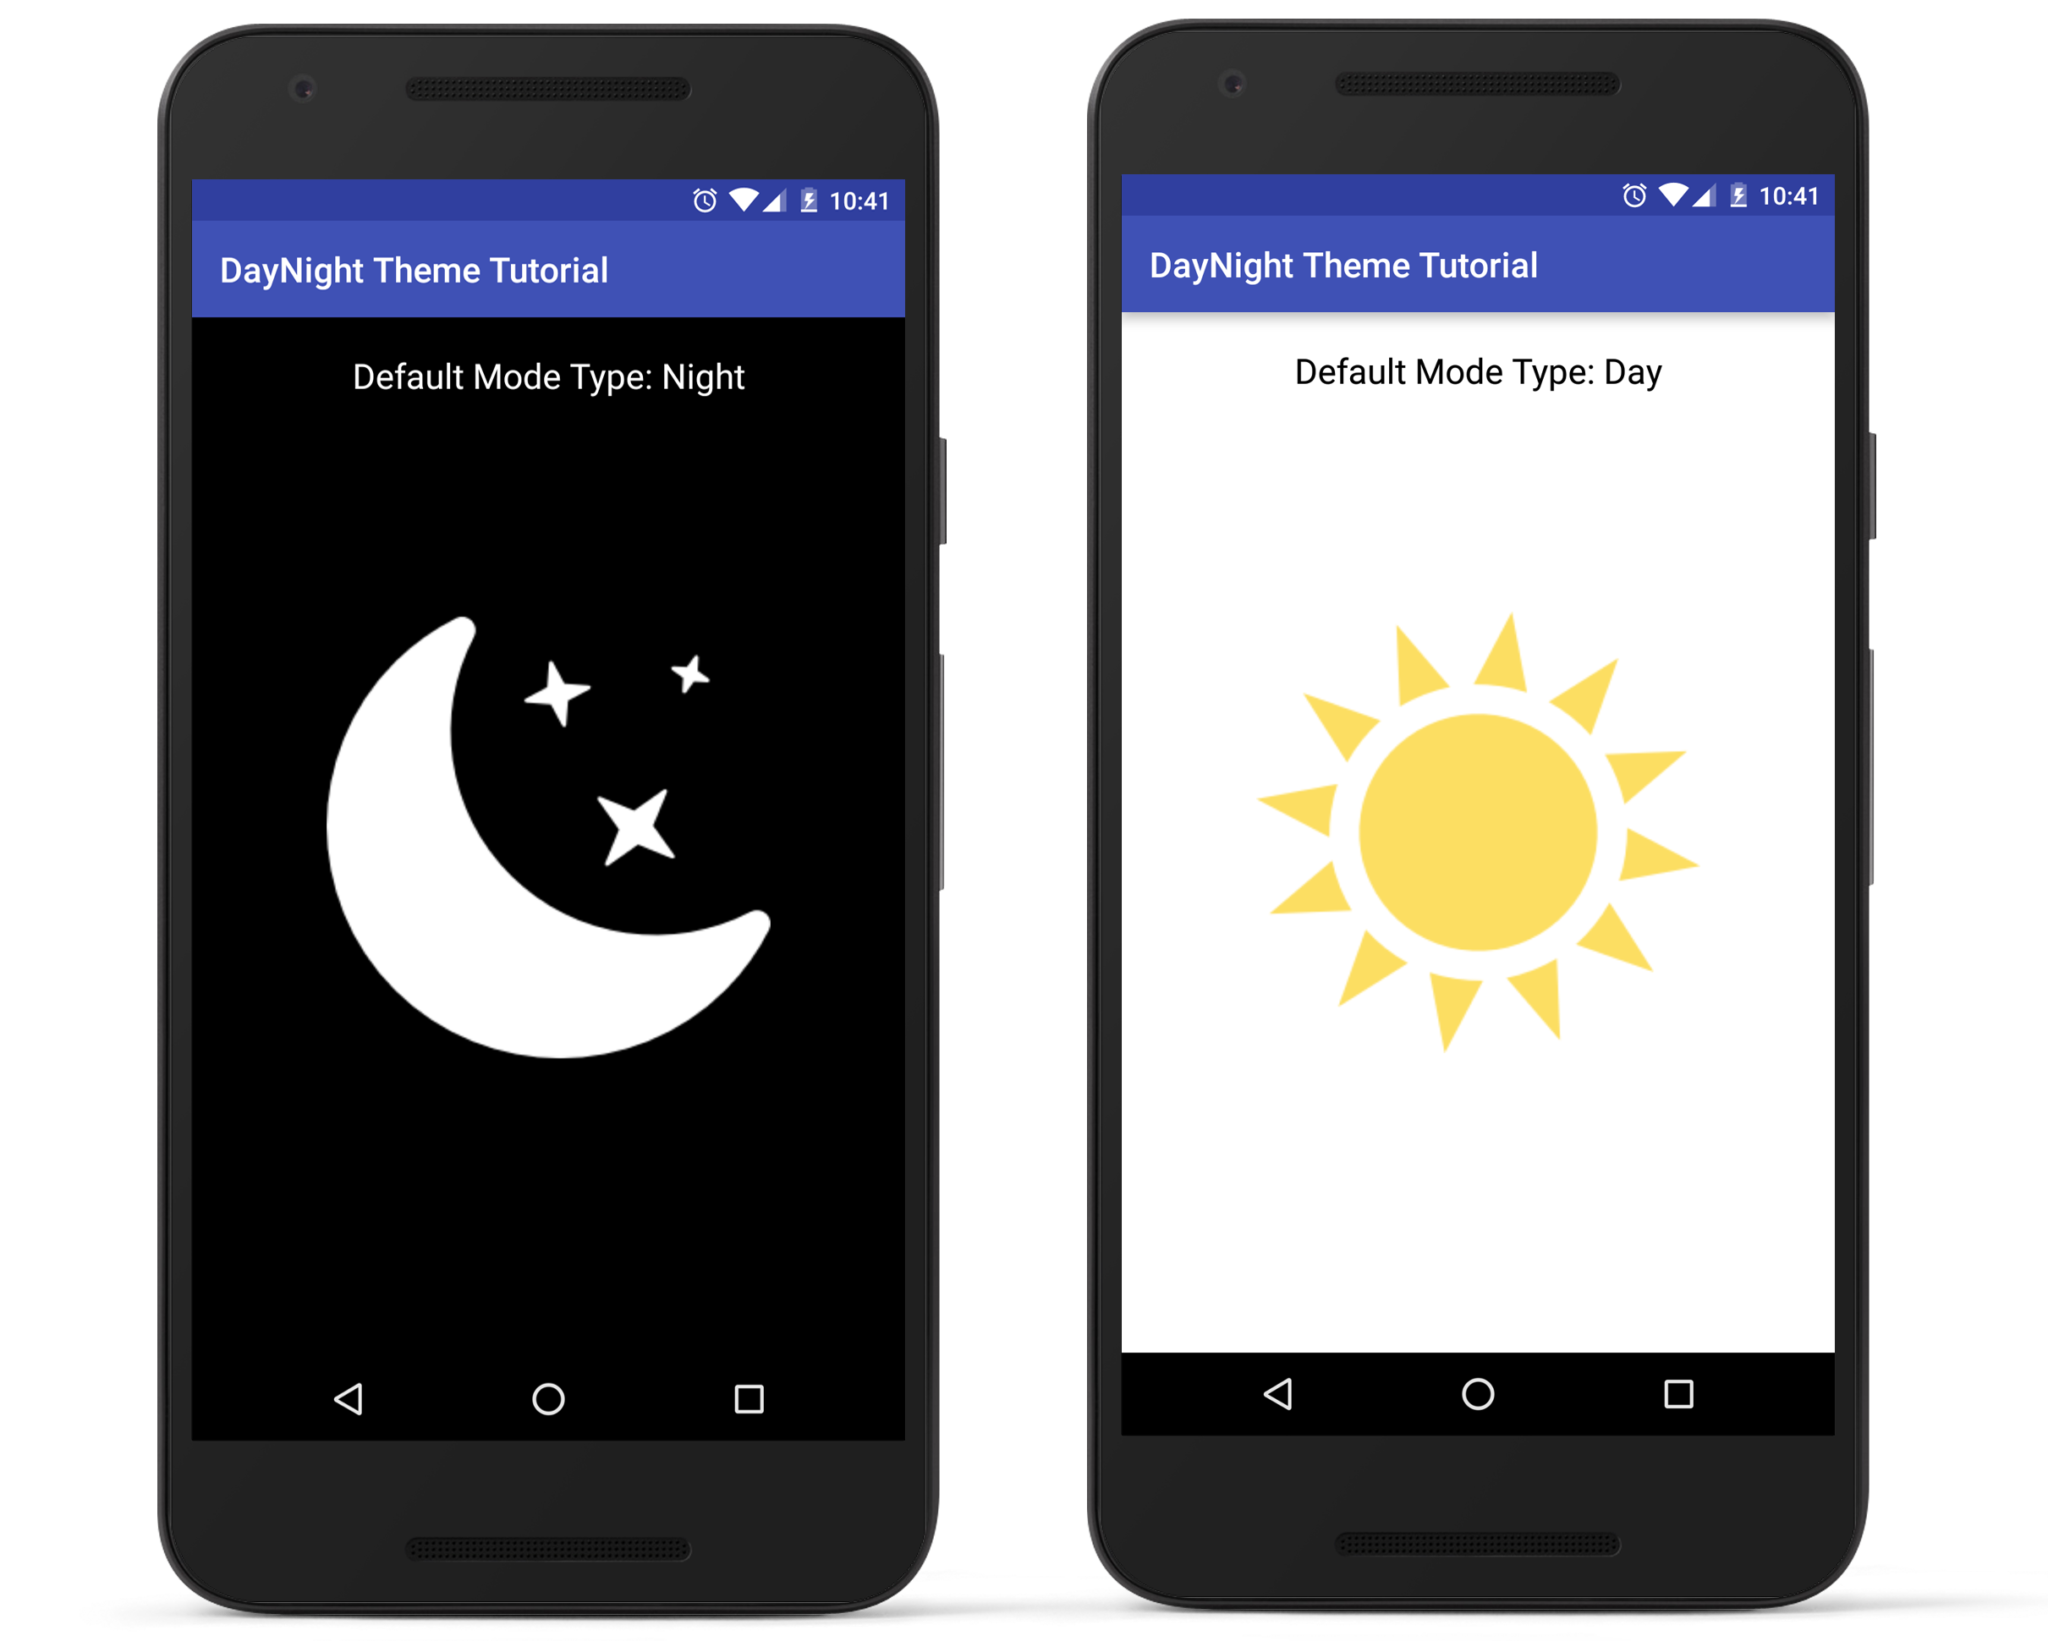
The above code would result a screen like this:

MainActivity and Auto Mode

Night Mode and Day Mode
Enjoy Coding and Share Knowledge


