Android Expandable List View Tutorial
Expandable List View is a view that shows items in a vertically scrolling two-level list. It is different to list view as it allows two levels: groups that can individually be expanded to show its children. Each group can be expanded or collapsed individually to show or hide its children items. Basic usage of expandable list view is to group data by categories.
Let’s Get it Working
In this tutorial, we are going to learn how to use Expandable ListView. To really understand the usage of Expandable ListView we will create an app. The App contains a simple list view having groups and its children. This app shows how Expandable List View expands, collapses, and click actions. I assume that you have created a new android project. Source Code is available on GitHub.
Step 1) Update strings.xml.
Add the below string values to the string.xml located in res ⇒ values ⇒ strings.xml.
<resources>
    <string name="app_name">ExpandableListView</string>
    <string name="text_alcohol">Alcohol</string>
    <string name="text_coffee">Coffee</string>
    <string name="text_pasta">Pasta</string>
    <string name="text_cold_drinks">Cold Drinks</string>
    <string name="text_expanded">Expanded</string>
    <string name="text_collapsed">Collapsed</string>

    <string-array name="string_array_alcohol">
        <item>Vodka</item>
        <item>Rum</item>
        <item>Whiskey</item>
        <item>Gin</item>
        <item>Tequila</item>
    </string-array>

    <string-array name="string_array_coffee">
        <item>Espresso</item>
        <item>Macchiato</item>
        <item>Cappuccino</item>
        <item>Cafe Latte</item>
        <item>Ristretto</item>
    </string-array>

    <string-array name="string_array_pasta">
        <item>Carbonara</item>
        <item>Capellini</item>
        <item>Spaghetti</item>
        <item>Gnocchi</item>
        <item>Lasagnette</item>
    </string-array>

    <string-array name="string_array_cold_drinks">
        <item>Cola</item>
        <item>Lemonade</item>
        <item>Citrus soda</item>
        <item>Juice</item>
        <item>Sparkling Water</item>
    </string-array>
</resources>
Step 2) Create activity_main.xml.
Now create a layout file for the MainActivity.java i.e activity_man.xml and add the below code in your layout file. The code will create an expandable list view for the app.
<?xml version="1.0" encoding="utf-8"?>
<android.support.constraint.ConstraintLayout xmlns:android="http://schemas.android.com/apk/res/android"
    xmlns:app="http://schemas.android.com/apk/res-auto"
    xmlns:tools="http://schemas.android.com/tools"
    android:layout_width="match_parent"
    android:layout_height="match_parent"
    tools:context=".MainActivity">

    <ExpandableListView
        android:id="@+id/expandableListView"
        android:layout_width="match_parent"
        android:layout_height="match_parent"
        app:layout_constraintBottom_toBottomOf="parent"
        app:layout_constraintLeft_toLeftOf="parent"
        app:layout_constraintRight_toRightOf="parent"
        app:layout_constraintTop_toTopOf="parent" />

</android.support.constraint.ConstraintLayout>
Step 3) Create layout XML for expandable list.
To create a list view, we only need one XML layout file. But for Expandable ListView, we need two XML layout files. 1st one for the listview group item and 2nd one is for the list view child item.
1. Now create a layout file for list group i.e list_row_group.xml and add the below code in your layout file.
<?xml version="1.0" encoding="utf-8"?>
<LinearLayout xmlns:android="http://schemas.android.com/apk/res/android"
    android:layout_width="fill_parent"
    android:layout_height="wrap_content"
    android:orientation="horizontal"
    android:padding="8dp">


    <TextView
        android:id="@+id/textViewGroup"
        android:layout_width="fill_parent"
        android:layout_height="wrap_content"
        android:paddingTop="8dp"
        android:paddingBottom="8dp"
        android:textColor="@color/colorAccent"
        android:paddingLeft="?android:attr/expandableListPreferredItemPaddingLeft"
        android:textSize="17dp" />

</LinearLayout>
2. Next create a layout file for list child i.e list_row_child.xml and add the below code in your layout file.
<?xml version="1.0" encoding="utf-8"?>
<LinearLayout xmlns:android="http://schemas.android.com/apk/res/android"
    android:layout_width="match_parent"
    android:layout_height="wrap_content"
    android:orientation="vertical"
    android:background="@android:color/white"
    android:padding="16dp">

    <TextView
        android:id="@+id/textViewChild"
        android:layout_width="match_parent"
        android:layout_height="wrap_content"
        android:textColor="@android:color/black"
        android:paddingLeft="?android:attr/expandableListPreferredChildPaddingLeft"
        android:textSize="17dp" />

</LinearLayout>
Step 4) Writing the Adapter Class
Now create a package named adapter and create a class named ExpandableListViewAdapter.java and add below code. This class extends BaseExpandableListAdapter and it provides required methods to render listview.
– getGroupView() – Returns view for the list group item.
– getChildView() – Returns view for list child item.
package com.androidtutorialshub.expandablelistview.adapter;

import android.content.Context;
import android.graphics.Typeface;
import android.view.LayoutInflater;
import android.view.View;
import android.view.ViewGroup;
import android.widget.BaseExpandableListAdapter;
import android.widget.TextView;

import com.androidtutorialshub.expandablelistview.R;

import java.util.HashMap;
import java.util.List;

public class ExpandableListViewAdapter extends BaseExpandableListAdapter {

    private Context context;

    // group titles
    private List<String> listDataGroup;

    // child data
    private HashMap<String, List<String>> listDataChild;

    public ExpandableListViewAdapter(Context context, List<String> listDataGroup,
                                     HashMap<String, List<String>> listChildData) {
        this.context = context;
        this.listDataGroup = listDataGroup;
        this.listDataChild = listChildData;
    }

    @Override
    public Object getChild(int groupPosition, int childPosititon) {
        return this.listDataChild.get(this.listDataGroup.get(groupPosition))
                .get(childPosititon);
    }

    @Override
    public long getChildId(int groupPosition, int childPosition) {
        return childPosition;
    }

    @Override
    public View getChildView(int groupPosition, final int childPosition,
                             boolean isLastChild, View convertView, ViewGroup parent) {

        final String childText = (String) getChild(groupPosition, childPosition);

        if (convertView == null) {
            LayoutInflater layoutInflater = (LayoutInflater) this.context
                    .getSystemService(Context.LAYOUT_INFLATER_SERVICE);
            convertView = layoutInflater.inflate(R.layout.list_row_child, null);
        }

        TextView textViewChild = convertView
                .findViewById(R.id.textViewChild);

        textViewChild.setText(childText);
        return convertView;
    }

    @Override
    public int getChildrenCount(int groupPosition) {
        return this.listDataChild.get(this.listDataGroup.get(groupPosition))
                .size();
    }

    @Override
    public Object getGroup(int groupPosition) {
        return this.listDataGroup.get(groupPosition);
    }

    @Override
    public int getGroupCount() {
        return this.listDataGroup.size();
    }

    @Override
    public long getGroupId(int groupPosition) {
        return groupPosition;
    }

    @Override
    public View getGroupView(int groupPosition, boolean isExpanded,
                             View convertView, ViewGroup parent) {
        String headerTitle = (String) getGroup(groupPosition);
        if (convertView == null) {
            LayoutInflater layoutInflater = (LayoutInflater) this.context
                    .getSystemService(Context.LAYOUT_INFLATER_SERVICE);
            convertView = layoutInflater.inflate(R.layout.list_row_group, null);
        }

        TextView textViewGroup = convertView
                .findViewById(R.id.textViewGroup);
        textViewGroup.setTypeface(null, Typeface.BOLD);
        textViewGroup.setText(headerTitle);

        return convertView;
    }

    @Override
    public boolean hasStableIds() {
        return false;
    }

    @Override
    public boolean isChildSelectable(int groupPosition, int childPosition) {
        return true;
    }
}
Step 5) Create MainActivity class.
Once you are done with the adapter creation, next create a class named MainActivity.java and add the below code. Here I have written the code to populate the expandable list view with data using ExpandableListViewAdapter, initialized the listener for a callback of on group expanded, collapsed, and on child clicked.
package com.androidtutorialshub.expandablelistview;

import android.os.Bundle;
import android.support.v7.app.AppCompatActivity;
import android.view.View;
import android.widget.ExpandableListView;
import android.widget.Toast;

import com.androidtutorialshub.expandablelistview.adapter.ExpandableListViewAdapter;

import java.util.ArrayList;
import java.util.HashMap;
import java.util.List;

public class MainActivity extends AppCompatActivity {

    private ExpandableListView expandableListView;

    private ExpandableListViewAdapter expandableListViewAdapter;

    private List<String> listDataGroup;

    private HashMap<String, List<String>> listDataChild;


    @Override
    protected void onCreate(Bundle savedInstanceState) {
        super.onCreate(savedInstanceState);

        setContentView(R.layout.activity_main);

        // initializing the views
        initViews();

        // initializing the listeners
        initListeners();

        // initializing the objects
        initObjects();

        // preparing list data
        initListData();

    }


    /**
     * method to initialize the views
     */
    private void initViews() {

        expandableListView = findViewById(R.id.expandableListView);

    }

    /**
     * method to initialize the listeners
     */
    private void initListeners() {

        // ExpandableListView on child click listener
        expandableListView.setOnChildClickListener(new ExpandableListView.OnChildClickListener() {

            @Override
            public boolean onChildClick(ExpandableListView parent, View v,
                                        int groupPosition, int childPosition, long id) {
                Toast.makeText(
                        getApplicationContext(),
                        listDataGroup.get(groupPosition)
                                + " : "
                                + listDataChild.get(
                                listDataGroup.get(groupPosition)).get(
                                childPosition), Toast.LENGTH_SHORT)
                        .show();
                return false;
            }
        });

        // ExpandableListView Group expanded listener
        expandableListView.setOnGroupExpandListener(new ExpandableListView.OnGroupExpandListener() {

            @Override
            public void onGroupExpand(int groupPosition) {
                Toast.makeText(getApplicationContext(),
                        listDataGroup.get(groupPosition) + " " + getString(R.string.text_collapsed),
                        Toast.LENGTH_SHORT).show();
            }
        });

        // ExpandableListView Group collapsed listener
        expandableListView.setOnGroupCollapseListener(new ExpandableListView.OnGroupCollapseListener() {

            @Override
            public void onGroupCollapse(int groupPosition) {
                Toast.makeText(getApplicationContext(),
                        listDataGroup.get(groupPosition) + " " + getString(R.string.text_collapsed),
                        Toast.LENGTH_SHORT).show();

            }
        });

    }

    /**
     * method to initialize the objects
     */
    private void initObjects() {

        // initializing the list of groups
        listDataGroup = new ArrayList<>();

        // initializing the list of child
        listDataChild = new HashMap<>();

        // initializing the adapter object
        expandableListViewAdapter = new ExpandableListViewAdapter(this, listDataGroup, listDataChild);

        // setting list adapter
        expandableListView.setAdapter(expandableListViewAdapter);

    }

    /*
     * Preparing the list data
     *
     * Dummy Items
     */
    private void initListData() {


        // Adding group data
        listDataGroup.add(getString(R.string.text_alcohol));
        listDataGroup.add(getString(R.string.text_coffee));
        listDataGroup.add(getString(R.string.text_pasta));
        listDataGroup.add(getString(R.string.text_cold_drinks));

        // array of strings
        String[] array;

        // list of alcohol
        List<String> alcoholList = new ArrayList<>();
        array = getResources().getStringArray(R.array.string_array_alcohol);
        for (String item : array) {
            alcoholList.add(item);
        }

        // list of coffee
        List<String> coffeeList = new ArrayList<>();
        array = getResources().getStringArray(R.array.string_array_coffee);
        for (String item : array) {
            coffeeList.add(item);
        }

        // list of pasta
        List<String> pastaList = new ArrayList<>();
        array = getResources().getStringArray(R.array.string_array_pasta);
        for (String item : array) {
            pastaList.add(item);
        }

        // list of cold drinks
        List<String> coldDrinkList = new ArrayList<>();
        array = getResources().getStringArray(R.array.string_array_cold_drinks);
        for (String item : array) {
            coldDrinkList.add(item);
        }

        // Adding child data
        listDataChild.put(listDataGroup.get(0), alcoholList);
        listDataChild.put(listDataGroup.get(1), coffeeList);
        listDataChild.put(listDataGroup.get(2), pastaList);
        listDataChild.put(listDataGroup.get(3), coldDrinkList);

        // notify the adapter
        expandableListViewAdapter.notifyDataSetChanged();
    }

}
Step 6) Run App
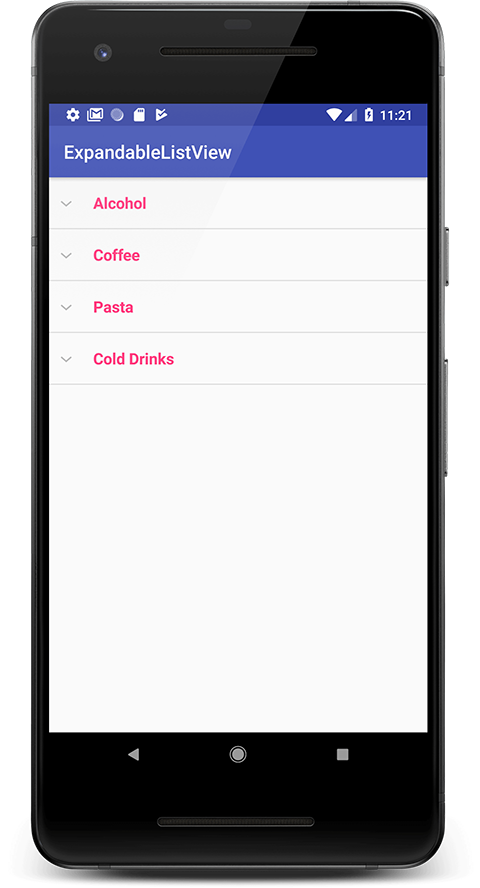
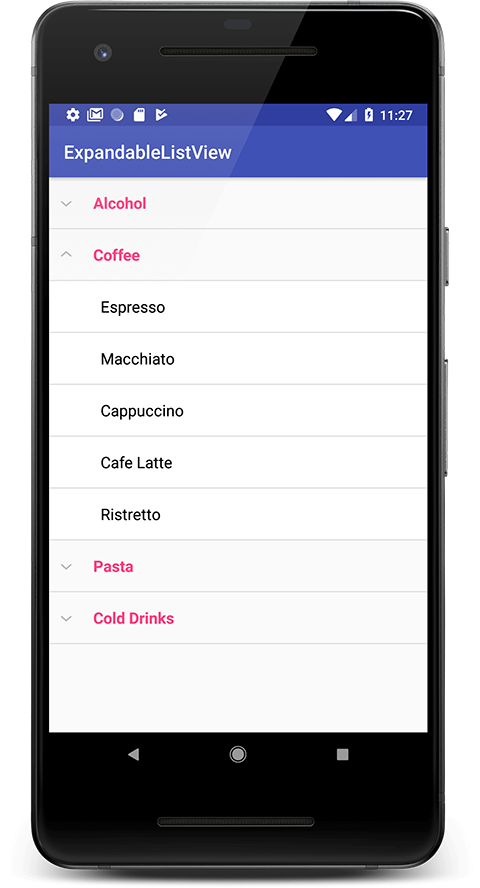
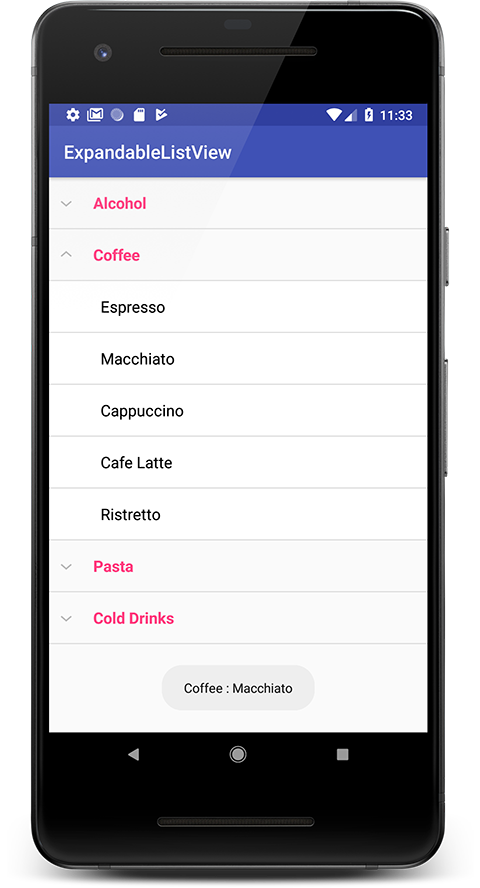
Register the above-created MainActivity in AndroidManifest.xml as the main activity and run the app by clicking the run button on Android Studio and you will see the UI mentioned above, click on any group item to expand and collapse.

Expandable List View Screen Collapsed

Expandable List View Expanded

Expandable List View Child Clicked
Please feel free to comment as well as ask questions. And, yeah! If this post helps you please do share!
Enjoy Coding and Share Knowledge


